


grind size
Categories
All articles

How to Make Cold Brew Coffee: Recipe & Tips
Jump to Recipe
Every year as the weather slowly starts to warm up there are small luxuries that help us mentally usher in and embrace the changing of the seasons, and one that can feel especially hard-earned after a New York winter is the first homemade batch of cold brew. While we always have traditional iced coffee, cold brew and nitro available in our cafes year round, there’s a certain poetry to Cold Brew season. Not only can making cold brew at home feel like a victory against darker days, it’s also one of the easiest ways to enjoy truly delicious coffee at home. While we have brew guides available for a wide range of brewed coffee options to help make cafe quality coffee accessible outside of the cafe, it doesn’t get any easier than set-it-and-forget-it.
Before we get into the specific recipe for cold brew, let’s first talk about how and why it works. There are literally hundreds of aromatic compounds in coffee that play together to impact how we experience flavor in a brew cup of coffee. These flavor compounds begin developing in the coffee beans themselves as they mature and ripen on the plant and are being built upon and manipulated throughout their journey from harvest to roasting and finally, brewing.
Not all flavor compounds in coffee extract under the same conditions or at the same speed, meaning how we brew our coffee has a massive impact on how we structure the flavor compounds inherent in the beans we’re using. Aside from making the process of dialing in a coffee incredibly fun and quite a rabbit hole, this also creates some rules we can follow.
Many of the flavor compounds in coffee are much more soluble at higher temperatures, meaning hot water will extract them much faster than cold water, and there are even some compounds that simply aren’t soluble below a certain threshold. So if we’re swapping out water in the 195-205°F range for water in the 50°F range, the timeline of extraction is going to change significantly. By extending the brew time from a typical hot brew of about 5 minutes to roughly 18 hours, we’re going to give some of those more stubborn compounds time to work their way into the brew. However, if all we changed was the brew time and kept the grind and ratio the same, we’d end up with a final product that was weak, bitter and flat, because the less stubborn, more soluble compounds would be contributing too much, imparting off flavors and lacking in complexity. By coarsening our grind and working with a much higher coffee to water ratio in addition to the extended brew time, we’re able to produce a final product that is rich and sweet, with a subtle balance of bitterness and acidity.
As with smaller scale filter brewing, the variables of brew time, grind size and ratio all work together, and changing one usually requires a change to at least one of the other two variables, unless you’re looking to produce notably different results. Our recipe is designed to steep between 16-18 hours and produces a concentrate meant to be diluted 1:1 with either milk, a milk alternative, or water. If you want to shorten that steep time, you can grind slightly finer and if you want to extend it, go slightly coarser. Steeping for too long (over 24 hours) or not long enough (under 12 hours) won’t have the same balance and perceived sweetness, but that still leaves some room to work with your schedule. That said, 16-18 will yield the best results.
Recipe
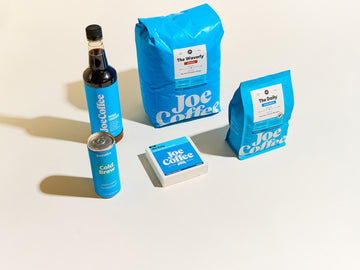
12oz Great Heights, ground coarsely, like Himalayan rock salt
64oz filtered water
A vessel to steep in, larger than 2L
Sieve or mesh strainer
Cheesecloth or jam/nut milk bag (optional)
Instructions
To start, mix coffee and water in a vessel large enough to accommodate both (a 1-gallon glass jar works well) and make sure all of the grounds are saturated by giving the jar a good stir.
Seal the jar tightly to prevent the cold brew from oxidizing too much during the brewing process and store in the refrigerator. We strongly recommend storing your cold brew in the fridge while it steeps. It’s true that cold brew can be produced at room temperature, but this can lead to inconsistent batches (if the ambient temperature changes) and also speeds up the process of oxidation, which is effectively the staling process. Brewing in the fridge will produce tastier, more consistent results and will lead to a slightly longer window of enjoyability.
The following day, between 16-18 hours from when you started your batch, pull it out of the fridge. Set a strainer over a vessel that’s at least 64oz, and carefully begin pouring the cold brew through to filter out the grounds. If you want a cup with less particulate, you can line the strainer with cheesecloth, or filter the batch a second time through a jam or nut milk bag. Filtering through coffee filters is an option, but be warned it can take upwards of hours to finish. Once you’ve filtered your batch to your satisfaction, you’re done!
Enjoying & Storing
You’ll have a little under half a gallon of concentrate that was produced with 3 times as much coffee to water as our standard drip recipe, so it’s pretty darn strong. We recommend storing the concentrate as is and diluting per serving. This will help extend shelf life, but also means you can make tweaks. Start by diluting the concentrate 1:1 with water, milk or a milk alternative. You can alter the ratios to your preference. If you play around a bit and still feel like it’s not exactly where you want it to be, look to make a change to your brewing, starting by grinding slightly finer or coarser to strengthen or soften the brew intensity. We’d only recommend shortening or lengthening the brew time outside of 16-18 hours if your schedule requires it.
This concentrate will last in the fridge for 7 days, but you may notice the flavor change day to day. Storing the cold brew in a vessel with as little headspace as possible will help it taste fresher longer.

Our Tips for Better Home-Brewed Coffee
For many of us, brewing coffee at home is not only a necessary step in getting our day started, it's also a rewarding daily ritual, a moment of mindfulness. Whether you're new to brewing at home or you're regularly tweaking your recipe in pursuit of the perfect cup, there are a few simple concepts that will help you master the art of the home brew.To get started, pick your brew method and take a look at our brew guides for Chemex, Kalita Wave, Aeropress, Hario V60, and espresso. Each guide provides step-by-step instructions for tried and true recipes specific to each brew method. Beyond straight technique however, there are other variables that can impact the success of a cup, so we have delved into each of these factors in this guide to lend a helping hand to all of you home baristas out there.This guide is geared towards filter coffee brewing, but the same philosophies can be applied to espresso.
Coffee to Water RatioYour coffee to water ratio, frequently referred to as your brew ratio, is the building block of establishing good coffee brewing. If you use too much water to brew a fixed amount of coffee, you will over-extract your coffee, resulting in a cup that is bitter and weak. If you use too little water, you will get a brew that is sour and strong. However, with an appropriate brew ratio, it can be easy to produce consistently sweet and balanced coffees.So how do you achieve that appropriate brew ratio? We recommend weighing both your coffee and water to get the most precise brew ratio, but if you don’t have a scale at home and prefer to use volumes, this can work too. An industry standard jumping off point is 1:16—for every 1g of coffee, you’ll want to use 16g of water. Scaling this is super easy—if you know you have 25g of coffee you want to brew, just multiply that by 16 to get your water weight of 400g.If you know you want to brew a large batch of coffee—let’s say 500ml—just divide that by 16 to get your coffee weight of 31.25g (water is essentially a 1:1 conversion from ml to grams). While 1:16 is the most common brew ratio for filter pour over methods and batch brew, immersion methods like French Press and Aeropress typically work better with stronger ratios, closer to 1:14. Of course, if you find you prefer a slightly stronger cup, experiment with a 1:15 ratio, or perhaps 1:17 if you want a more delicate expression.
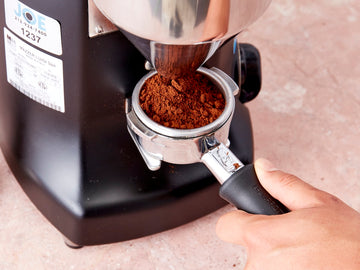
Grind SizeGrind size is one of the hardest aspects of a brew recipe to talk about because it can be extremely relative. Not only are we talking about the grinding of brittle, organic matter, which is nearly impossible to do with complete uniformity without mindbogglingly expensive equipment, but factors like wear-and-tear, temperature and roast level will all impact how a specific grinder behaves. Putting all of that aside, the grind size of your coffee has a large impact on the quality of your final brew and is one of the first things you can look to if you want to change how your coffee is tasting. A quick disclaimer—you’ll need a burr grinder in order to really take control of this variable. Burr grinders grind coffee between two discs (burrs) that shear the coffee to a specific size. While they’re imperfect as stated above, they are very good at producing even and consistent grinds. Blade grinders on the other hand function more like blenders, blindly hacking away at a mass of beans, leaving you with some coffee powder and some near-whole coffee beans. Uniformity of grind is the most important aspect here. If you don’t have a burr grinder at home, fret not—we can pre-grind coffee for you at our roastery if you select this option at checkout. We’ve done some informal taste tests and pre-grinding with a quality grinder produces better results than grinding fresh with a sub-par grinder every time.Grind size has a compounded impact on cup quality. When you grind coffee finely, you’re increasing the amount of surface area on every single particle in the coffee filter which will cause them to extract faster. When you coarsely grind coffee, the water has to worker harder to penetrate deeper due to a decreased surface area. This process is called diffusion. An analogy we revisit often in training is cooking garlic—mincing a glove of garlic is going to cause the majority of the clove to cook faster than if you tried to cook it whole, where the center would stay raw while the outside burns. But not only does the size of your grind impact how readily the coffee can extract but it also impacts how quickly the water can flow through the coffee. Another analogy—imagine you have two buckets, each with a hole in the bottom. If you fill one with sand and one with pebbles and dump a gallon of water into each, which one will drain faster? The sand is so fine that there’s little space between each grain, slowing the flow of water, while the pebbles will allow the water to pass more freely. The finer you grind your coffee, the slower the water will flow and the longer your brew will take. The inverse is true the coarser you go—the brew will be shorter because the water can pass more easily through the bed. So what does this all mean for dialing in the grind size for your brew method? Time and taste are your friend. If you’re finding that your coffee tastes harsh or bitter and is brewing slowly, try coarsening your grind. Don’t change anything else—that way you can see the impact of one variable at a time. If your coffee is tasting flat and weak and the brew is quick, trying going a bit finer.Brew TimeSo how long should your brew take? The brew method of your choice will determine the answer. For single cup pour overs, like the Hario V60 or Kalita Wave, anywhere from 2-4 minutes is acceptable depending on your recipe. We like to aim for around 3 minutes. For larger brewers like the Chemex, you should expect a longer brew. We aim for 5 minutes but some recipes extend closer to 7. This is because there’s a larger mass of coffee in the filter and the water is going to have to navigate tighter spaces to pass through.Bringing it back to grind size, as a general rule, the larger your brew, the coarser you should grind to account for this. Immersion brew methods like the French press or Aeropress are an exception to this rule. With these types of brews the grind size will affect how much the coffee extracts but it will not impact the brew time, since that is a predetermined part of the recipe.Putting It All TogetherGrab a bag of coffee and pick a recipe from our brew guides. Start by following the recipe to a T and have a taste. Most likely, the first adjustment you’ll look to make is to your grind, taking stock of the flavor and overall brew time. If you get the time right but the flavor could still be tailored to your preferences, consider adjusting the brew ratio. Keep in mind that coffee changes as it ages—the fresher the coffee, the more expressive it will be. As it ages over weeks and days the flavors will soften a bit. We recommend brewing and enjoying our coffee between 1-3 weeks from the roast date on the bag.